$0.00
One of the most common things I see as a Graphic Designer, who also happens to run a print and sign shop, is people wanting to do their own designs, trying to cut costs. We all want to cut costs, and while I consider myself to be the queen of frugality, there is always a point where hiring a professional is just worth the time, effort and money. If you have decided to go down the Do It Yourself route, there area a few things to keep in mind when getting ready to go to print. Today I am going to touch on the use of graphics.
Snagging images off the internet for your printed products
Purchasing: The big bad internet can be a very useful resource when finding just the right image to get your idea across. I cannot emphasize enough caution here. Be aware of copyrights and intellectual property rights on images, respect them. Purchase your graphics when needed, support the artists who depend on selling their work to earn a living. You would be surprised by just how many images one person must sell per month to earn anything worth talking about, and how many of them sell next to nothing. Artists should not have to work for free.
Some decent places to snag images are:
- stock.adobe.com
- dreamstime.com
- shutterstock.com
- www.foap.com (as far as I understand it, this one pays the artist the most out of all the ones listed.)
- creepymonkey.ca/product-category/clipart/ This selection is my own, and is quite small at the moment as I just recently started it. More will be added as I can.
Freebies: There are tons of freebies floating around out there, I even take advantage of those sometimes when I can. Watch out with these though. Often what you are downloading is geared towards online use, not printing. Make sure to pay attention to the file type, and the size. You could find the best most suited graphic for free, for your purpose, and find out at print time that it is pixelated and horrible looking. Depending on the printer you are using, they often do not stop to see if your “Print Ready” art work looks good, they just hit print, and you pay for it whether it meets your expectations or not. When in doubt, run a test print at home… come to think of it, always run a test print at home. You might be amazed at the errors you can find. Also, when downloading images, keep in mind there is a difference between “Free” and “Royalty Free”. Free is free, Royalty Free in a nut shell means once you purchase the image, you get to use the material without paying royalty fees or license fees for each use.
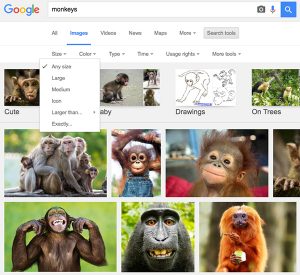
Searching for images
Google has a fantastic tool to help with Searching images. simply type in the topic you wish to search, click on Images, then in the menu bar beneath your topic, click on Search Tools. In the drop down menu from there, click on Size/Larger Than… and select either 2 mp or 4 mp, depending on how big of a graphic you would like. If you find a large enough image, as long as the pixel size is fairly large, you can increase the dpi as you decrease the pixel size, and end up with a graphic that prints beautifully. Just depends on how large of a finished graphic you are trying to produce.
On the note of file type and size: Typically online you will find jpg, png, and gif. The file type that might print nice is the jpg. I say might, because it depends on how the file was saved. generally an image saved specifically for a webpage, is saved at 72 dpi or smaller. Optimum dpi for printing is 300 (see below for specifics). I have seen some people take their 72 dpi photo into photoshop and simply go into image settings, and change that number. Some of you may be laughing right now, others may be nodding their heads cause yes, they have done it. This will not give you the quality image you are looking for. I would love to explain this one for those who have tried it, but that is a whole blog entry of its own.
File Sizes and The Printing Job
Depending on what you are printing, you will need different files sizes. When printing brochures, business cards, flyers and such, you want 300 dpi. If you are designing a file to be printed on a billboard or a sign, you can get away with a much smaller resolution, generally these are printed at 150 dpi or less depending on how large it is. These do not need such a high resolution, as they are being viewed from farther away, so visually will still look crisp… unless you are standing two feet in front of them. I strongly suggest you contact the printer for what specs they want for the file, before you begin designing. Not all print shops run the same programs, so do not assume what works for one shop, will work for the next.
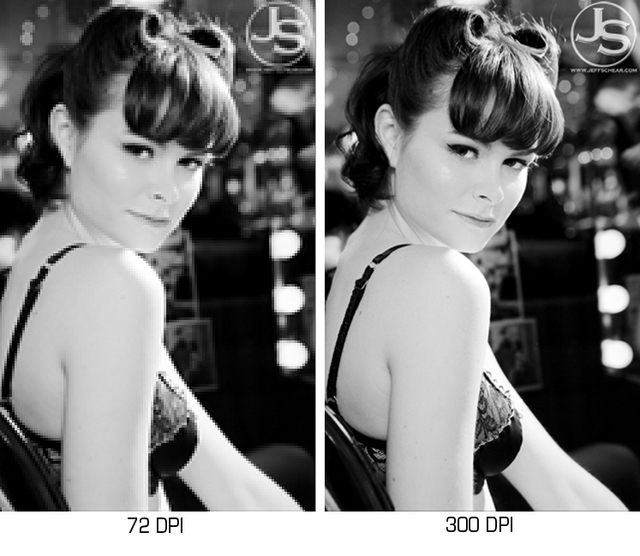
Difference between 72 dpi and 300 dpi when printing. Photo credit: The Photo Ninja
Now just because a billboard is printed at a smaller dpi, doesn’t mean all large format printing will be the same. Take for example the large posters you see hanging in store windows. Those are meant to be viewed from closer proximity, so the dpi is more.
So just a quick recap, always call the printer you are going to use and check what file type they want. Your pixels could be perfect, but if you send the wrong file extension, it will not get printed. Watch your pixel size. ALWAYS do a printout of a proof before going to print. Typically any stationary sized printing requires 300 dpi. Don’t even get me started on Full Bleed. There is much much more involved, so stop back in for more Creepy Tips!